Deploy Nextcloud 11 on Ubuntu 16.04 Cloud Instance
Background
So far in this series, we have covered how to install a Nextcloud and sync files across clients on multiple devices in a sandbox environment. This was all very good for becoming comfortable in the installation & basic usage of Nextcloud but we still don’t have anything providing value.
In this article we’ll deploy to production so that by the end we’ll have a secure, private sync-n-share application over which we have a high degree of control.
I’ve deployed my Nextcloud an a Digital Ocean droplet. If you are hosting yours in a home network you will have different steps but many of the considerations will apply.
I will cover in this article:
- Preparing your private cloud instance for secure hosting
- Installation of Nextcloud include advanced security configuration
- SSL certificate verification with Let’s Encrypt
- Usage & additional considerations
I must recognize two things before continuing:
- Digital Ocean has a “one-click” install for ownCloud. I haven’t tried it but it’s likely much easier than what I’m demonstrating here, however, as mentioned in an earlier article I’d prefer understanding & control. Other private cloud vendors may have similar offerings.
- I did mention in the last article I’d be using Docker for production. I decided to delay that option because I was eager to get my Nextcloud instance up and running and had everything in place to make it work. I do certainly intend to revisit this at a later date.
Server Preparation
Spin up an instance of Ubuntu 16.04 (or greater) with a private cloud provider (Digital Ocean, VPSie, vultr, etc). Results may vary with versions of Ubuntu later than 16.04. Please review the Nextcloud document for CentOS-specific requirements.
Login to your instance and create a non-root user with sudo privileges. For the purposes of this tutorial we’ll pretend this user is called “mrcloud” and your public IP is “222.222.222.222”.
Register a domain name,
if you do not have one and add a
CNAME record for
cloud.yourdomain.tld Note you can do this with just an IP address,
however, the remaining instructions assume you are using a domain.
Because you’ll be using a public IP I would also:
- disable ssh remote root login & password-based authentication
- set-up firewall rules to filter incoming traffic
Log in as root to the server as per your provider instructions then add the non-admin user.
adduser mrcloud
usermod -aG sudo mrcloud
Back on your desktop copy the ssh public key to the server:
ssh-copy-id [email protected]
Enter the password created earlier when prompted & login.
ssh [email protected]
sudoedit /etc/ssh/sshd_config to include the following lines :
PermitRootLogin no
PasswordAuthentication no
Reload ssh and exit:
sudo systemctl reload ssh
exit
Back on your desktop, add to the ~/.ssh/config file:
Host nextcloud
    HostName 222.222.222.222
    User mrcloud
    Port 22
Now you can log-in with:
ssh nextcloud
We also want to implement a basic firewall to allow only incoming http, https & ssh. We’ll use “uncomplicated firewall” - ufw - on Ubuntu. On CentOS you’ll want to look into firewalld.
ufw should be installed with Ubuntu 16.04 but disabled by default. Let’s enable & set some rules to allow only the incoming traffic we expect:
sudo ufw enable
sudo ufw default deny incoming
sudo ufw default allow outgoing
sudo ufw allow ssh
sudo ufw allow http
sudo ufw allow https
If you want to be even more secure you can restrict based on incoming
IP. For example let’s say your home’s public IP is 99.88.77.66 and
that is the only place you expect ssh access to originate from.
sudo ufw delete allow ssh
sudo ufw allow from 99.88.77.66 to any port 22 proto tcp
Nextcloud Installation
Installing the Nextcloud server was covered in-depth in my first article in the series.
For completeness I’ll repeat all necessary steps but in a more compact form. I will leave the creation of the virtual host file until a sub-section at the end as I will deviate from the previous instructions. We will be adding some additional security options.
Install Prerequisites
Install MariaDB, Apache & PHP modules:
sudo apt install -y mariadb-server mariadb-client apache2 \
php7.0-common php7.0-cli php7.0-bz2 php7.0-curl php7.0-gd php7.0-intl php7.0-mbstring php7.0-mcrypt php7.0-mysql php7.0-xml php7.0-zip libapache2-mod-php7.0
sudoedit /etc/mysql/conf.d/nextcloud.cnf to create the necessary MariaDB configurations:
# Nextcloud database configuration file
[mysqld]

# disable binary logging
skip-log-bin

# use transaction read committed isolation
transaction-isolation=read-committed

# enable emojis
innodb_large_prefix=true
innodb_file_format=barracuda
innodb_file_per_table=true
Restart & login as root:
sudo systemctl restart mysql
sudo mysql -uroot
Create the database and user, replacing DBPASS with your own password.
CREATE DATABASE nextcloud CHARACTER SET utf8mb4 COLLATE utf8mb4_general_ci;
CREATE USER oc_nextadmin@localhost IDENTIFIED BY 'DBPASS';
GRANT ALL PRIVILEGES ON nextcloud . * TO oc_nextadmin@localhost;
FLUSH PRIVILEGES;
exit
Enable the required Apache modules:
sudo a2enmod rewrite headers env dir mime ssl
Install Nextcloud
Download & verify the bz2 archive for the latest stable version of Nextcloud server from: https://nextcloud.com/install/#instructions-server
Once you have downloaded and verified the integrity of the archive, untar it to the final location (replacing 11.X.Y with the latest version number).
sudo tar -xvjf nextcloud-11.X.Y.tar.bz2 -C /var/www/
Change the ownership to the HTTP user then move to that directory to complete the final install.
sudo chown -R www-data:www-data /var/www/nextcloud
cd /var/www/nextcloud
Complete the install with occ, replacing the capitalized passwords
with your own.
sudo -u www-data php occ maintenance:install \
--database "mysql" --database-name "nextcloud" \
--database-user "oc_nextadmin" --database-pass "DBPASS" \
--admin-user "nextadmin" --admin-pass "ADMINPASS"
Harden the security of the server by running the script that is recommended in the Nextcloud manual.
Copy the entire script text (which starts #!/bin/bash) to a file say
nextcloud_harden.sh, then make it executable & execute it:
chmod +x nextcloud_harden.sh
sudo ./nextcloud_harden.sh
sudoedit /var/www/nextcloud/config/config.php to
add the public IP and name to the trusted_domains variable, making
sure to use your proper IP & domain name.
'trusted_domains' =>
array (
  0 => 'localhost',
  1 => '222.222.222.222',
  2 => 'cloud.yourdomain.tld',
),
Create Secure Apache Virtual Host File
As mentioned earlier, I’ve updated this part from the previous article as we’re now public. We want a bit more security so let’s:
- Redirect all HTTP traffic to HTTPS
- Add the HTTP Strict Transport Security header
- Hide Apache Version & OS Identity
- Close down all other directories
sudoedit /etc/apache2/apache2.conf first addding
two options to the end of the file to hide information on OS &
Apache version in 403 (forbidden) & 404 (not found) responses:
# Hide OS/Apache version information in both HTML & response header
ServerSignature Off
ServerTokens Prod
sudoedit /etc/apache2/sites-available/nextcloud.conf to create the Nextcloud virtual hosts configurations with
explanatory comments:
# Ensure nextcloud listens on ports 80 & 443
Listen 80
Listen 443

# Alias for explicit HTML to file directory mapping
Alias /nextcloud "/var/www/nextcloud/"

# Redirect all HTTP traffic to HTTPS
<VirtualHost *:80>
        # Only take traffic for "cloud.*" CNAME
        ServerName cloud.yourdomain.tld
        Redirect permanent / "https://cloud.yourdomain.tld/"
</VirtualHost>

<VirtualHost *:443>
        ServerName cloud.yourdomain.tld

        # Use SSL
        SSLEngine on
        SSLCertificateFile      /etc/ssl/certs/ssl-cert-snakeoil.pem
        SSLCertificateKeyFile /etc/ssl/private/ssl-cert-snakeoil.key

        # HTTP Strict Transport Security (15768000 seconds = 6 months)
        Header always set Strict-Transport-Security "max-age=15768000"

        ErrorLog ${APACHE_LOG_DIR}/error.log
        CustomLog ${APACHE_LOG_DIR}/access.log combined

        # Directory specific options as per Nextcloud template
        <Directory /var/www/nextcloud/>
          Options +FollowSymlinks

          # Override all settings .htaccess files auto-installed with Nextcloud
          AllowOverride All

          <IfModule mod_dav.c>
            Dav off
          </IfModule>

        SetEnv HOME /var/www/nextcloud
        SetEnv HTTP_HOME /var/www/nextcloud
        </Directory>
</VirtualHost>
Back in the console, we’ll enable the Nextcloud site, remove the default Apache index.html file & restart the server.
sudo a2ensite nextcloud
sudo rm /var/www/html/index.html
sudo service apache2 restart
Confirm the installation by visiting http://cloud.yourdomain.tld/nextcloud. As in our previous articles you’ll still need to add the security exception for the self-signed SSL certificate.
You can set up a different virtual host file to serve different content from this Apache server or redirect traffic another server based on host name, but that is beyond the scope of this article.
But now that you’ve verified the secure installation is working, let’s get certified!
Getting Certified with Let’s Encrypt
Let’s Encrypt is a free, automated and open Certificate Authority. Pretty awesome. We can follow the certbot instructions to fetch & deploy the verified SSL certificate.
sudo apt -y install python-letsencrypt-apache
Then run the program:
sudo letsencrypt --apache
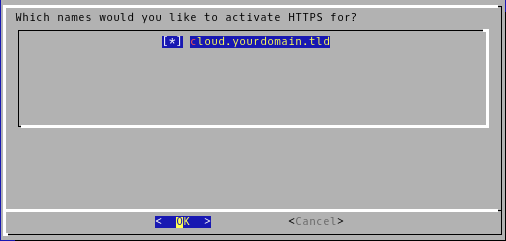
- You should only have the one domain - “cloud.yourdomain.tld” - to select, ensure it is selected & continue.
- Provide your email.
- Select “Easy - Allow both HTTP and HTTPS access to these sites” since we’ve already created a secure configuration.
- Click OK - that’s it!
Once all steps are complete you can try accessing the site again. You should no longer receive a security error when accessing the site plus you’ll see a green lcok icon in the top-left corner indicating the verification.
This will expire after 90 days so you will need to renew. I will leave that piece up to you. You can find some useful documentation here: https://certbot.eff.org/docs/using.html#renewal
Usage & Additional Considerations
You are good to go! You can start using your production instance right away with a few [desktop](/post/nextcloud-clients/ or mobile clients.
I must report excellent usability & performance so far with only 512MiB of RAM and 1 CPU on a 20GiB SSD Digital Ocean droplet. Of course it’s just me and I only have about 2GiB of files in play. Results may vary.
As you explore and expand your usage, you’ll need to install apps and make additional configurations but there are a few things to consider right-away:
Disaster Recovery
You’ll definitely want to consider disaster recovery. I have yet to put that in place but certainly plan to soon. Recommendations are provided in the Nextcloud administration manual: https://docs.nextcloud.com/server/11/admin_manual/maintenance/index.html
My plan is to create a cronjob to back-up once a day to local storage.
For sending email notifications and enabling password reset through email you’ll need an email server. I wouldn’t bother as it’s just me but I may yet to learn how it works.
Nextcloud has some comprehensive documentation on different options here: https://docs.nextcloud.com/server/11/admin_manual/configuration_server/email_configuration.html
Next Article Series
I think I’m done writing on Nextcloud for a bit. I next plan to take on this challenge by Dan Langille. The purpose is to find your tech passion by completing a truly full stack personal tech project while blogging about it to find out - what is that tech discipline that creates the most enjoyment for you - is it the hardware, system administration, networking, development or even the writing? Let’s do it!