Create a Household Wiki using Vimwiki
Background
Several years ago I signed up with the Windows Office 365 subscription at $11.95 Can. I definitely want out and for most functions I can use LibreOffice. However, I have a lot of my personal notes & knowledge base in OneNote. I like OneNote but I don’t want to be paying those dollars for it and I want something I can have more control of.
In comes Vimwiki. Vimwiki is a free & open source Vim plugin which allows you to create and organize knowledge, to-do lists, random notes, etc… basically your household or personal wiki.
Getting Started with Vim
If you are already familiar with Vim then you are well on your way to take advantage of Vimwiki.
If not, you should install and then go through the basic 30 minute tutorial and make sure you want to work with it. For someone like me with a background in the GUI-heavy MS Office Suite it was a bit hard to get used to but I’m starting to really like it.
On GNU/Linux distributions Vim may already be installed. If not, install with your package manager, for example on CentOS:
sudo yum -y install vim
I haven’t started using Vim on Windows yet, but there’s some instructions on the official downloads site for Windows and also Mac OS: http://www.vim.org/download.php/
Once installed, start the 30-minute tutorial and follow along:
vimtutor
Installing Vimwiki
If you don’t already have it you should install pathogen.vim which makes installing Vim plugins easy.
Use the following multi-line command from the GitHub README for Linux or Mac OS:
mkdir -p ~/.vim/autoload ~/.vim/bundle && \
curl -LSso ~/.vim/autoload/pathogen.vim https://tpo.pe/pathogen.vim
For Windows you’ll need to install and use
Cygwin (or similar) and for the command above
replace /.vim with ~\vimfiles
Create or edit your vimrc file:
vim ~/.vimrc
Enter insert mode my hitting i then add the following lines. The first
3 are required for pathogen.vim. The other 2 are required for Vimwiki so
let’s just put them in there now.
execute pathogen#infect()
syntax on
filetype plugin indent on
filetype plugin on
set nocompatible
Enter normal mode with Esc then save & quit by typing :wq and
pressing Enter.
Now you can install Vimwiki or any other plugin very easily as follows (first install Git if you don’t have it already).
cd ~/.vim
mkdir -p bundle
cd bundle
git clone https://github.com/vimwiki/vimwiki.git
Verifying Install & Vimwiki Help
To verify the install run vim. Then enter the normal-mode commands
:Helptags followed by :help vimwiki.
You should see a help page with a table of contents. Browse as you would like or move on to the simple starter.
Some extra navigation tips:
- Move your cursor to the start of the section name (e.g.
vimwiki-intro) and press*to jump to the entry. - To move back to the contents immediately (haven’t yet moved cursor),
simply enter
# - If you’ve moved your cursor you can enter
?CONto return.
Your Vimwiki Starter
While in Vim enter <Leader>ww which is usually \ww. You will be
prompted to make a new directory in /home/you/vimwiki. Enter y.
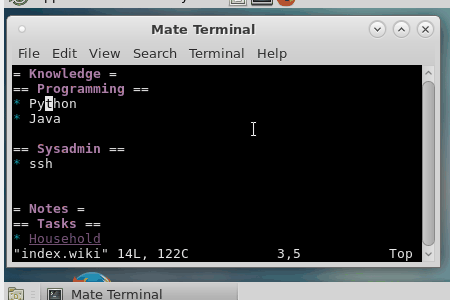
Let’s create something simple for practice. You probably want to plan out your organization before you start adding any significant amount of content.
= Knowledge =
== Programming ==
* Python
* Java

== Sysadmin ==
* ssh

= Notes =
== Tasks ==
* Household
* Work
Another essential feature to note are wiki links. While in
normal-mode simple press enter and the word in context will become a
link surrounded in double square brackets, e.g. [[Python]]. Press
enter again and Vim will open a new buffer with the same name, e.g.
Python.wiki.
Finally, enter :wq to save both file and quit.
Vimwiki Demo
Next Steps
Design the organizational structure for your wiki then start adding content. Also consider version control. Pure Git is an option but I’m personally going to trial Sparkle Share which seems purpose built for this kind of thing.